Spring使用AspectJ开发AOP:基于XML和基于Annotation
AspectJ 是一个基于 Java 语言的 AOP 框架,它扩展了 Java 语言。Spring 2.0 以后,新增了对 AspectJ 方式的支持,新版本的 Spring 框架,建议使用 AspectJ 方式开发 AOP。
使用 AspectJ 开发 AOP 通常有两种方式:
- 基于 XML 的声明式。
- 基于 Annotation 的声明式。
接下来将对这两种 AOP 的开发方式进行讲解。
基于XML的声明式
基于 XML 的声明式是指通过 Spring 配置文件的方式定义切面、切入点及声明通知,而所有的切面和通知都必须定义在 <aop:config> 元素中。
下面通过案例演示 Spring 中如何使用基于 XML 的声明式实现 AOP 的开发。
1. 导入 JAR 包
使用 AspectJ 除了需要导入 Spring AOP 的 JAR 包以外,还需要导入与 AspectJ 相关的 JAR 包,具体如下。
- spring-aspects-3.2.13.RELEASE.jar:Spring 为 AspectJ 提供的实现,在 Spring 的包中已经提供。
- com.springsource.org.aspectj.weaver-1.6.8.RELEASE.jar:是 AspectJ 提供的规范,可以在官方网址 https://repo.spring.io/webapp/#/search/quick/ 中搜索并下载。
2. 创建切面类 MyAspect
在 src 目录下创建一个名为 com.mengma.aspectj.xml 的包,在该包下创建切面类 MyAspect,编辑后如下所示。
package com.mengma.aspectj.xml;

import org.aspectj.lang.JoinPoint;
import org.aspectj.lang.ProceedingJoinPoint;

//切面类
public class MyAspect {
    // 前置通知
    public void myBefore(JoinPoint joinPoint) {
        System.out.print("前置通知,目标:");
        System.out.print(joinPoint.getTarget() + "方法名称:");
        System.out.println(joinPoint.getSignature().getName());
    }

    // 后置通知
    public void myAfterReturning(JoinPoint joinPoint) {
        System.out.print("后置通知,方法名称:" + joinPoint.getSignature().getName());
    }

    // 环绕通知
    public Object myAround(ProceedingJoinPoint proceedingJoinPoint)
            throws Throwable {
        System.out.println("环绕开始"); // 开始
        Object obj = proceedingJoinPoint.proceed(); // 执行当前目标方法
        System.out.println("环绕结束"); // 结束
        return obj;
    }

    // 异常通知
    public void myAfterThrowing(JoinPoint joinPoint, Throwable e) {
        System.out.println("异常通知" + "出错了" + e.getMessage());
    }

    // 最终通知
    public void myAfter() {
        System.out.println("最终通知");
    }
}
上述代码中,分别定义了几种不同的通知类型方法,在这些方法中,通过 JoinPoint 参数可以获得目标对象的类名、目标方法名和目标方法参数等。需要注意的是,环绕通知必须接收一个类型为 ProceedingJoinPoint 的参数,返回值必须是 Object 类型,且必须抛出异常。异常通知中可以传入 Throwable 类型的参数,用于输出异常信息。
3. 创建 Spring 配置文件
在 com.mengma.aspectj.xml 包下创建 applicationContext.xml 的配置文件,如下所示。
<?xml version="1.0" encoding="UTF-8"?>
<beans xmlns="http://www.springframework.org/schema/beans"
    xmlns:xsi="http://www.w3.org/2001/XMLSchema-instance" xmlns:aop="http://www.springframework.org/schema/aop"
    xsi:schemaLocation="
            http://www.springframework.org/schema/beans
            http://www.springframework.org/schema/beans/spring-beans-2.5.xsd
            http://www.springframework.org/schema/aop
            http://www.springframework.org/schema/aop/spring-aop-2.5.xsd">
    <!--目标类 -->
    <bean id="customerDao" class="com.mengma.dao.CustomerDaoImpl" />
    <!--切面类 -->
    <bean id="myAspect" class="com.mengma.aspectj.xml.MyAspect"></bean>
    <!--AOP 编程 -->
    <aop:config>
        <aop:aspect ref="myAspect">
            <!-- 配置切入点,通知最后增强哪些方法 -->
            <aop:pointcut expression="execution ( * com.mengma.dao.*.* (..))"
                id="myPointCut" />
            <!--前置通知,关联通知 Advice和切入点PointCut -->
            <aop:before method="myBefore" pointeut-ref="myPointCut" />
            <!--后置通知,在方法返回之后执行,就可以获得返回值returning 属性 -->
            <aop:after-returning method="myAfterReturning"
                pointcut-ref="myPointCut" returning="returnVal" />
            <!--环绕通知 -->
            <aop:around method="myAround" pointcut-ref="myPointCut" />
            <!--抛出通知:用于处理程序发生异常,可以接收当前方法产生的异常 -->
            <!-- *注意:如果程序没有异常,则不会执行增强 -->
            <!-- * throwing属性:用于设置通知第二个参数的名称,类型Throwable -->
            <aop:after-throwing method="myAfterThrowing"
                pointcut-ref="myPointCut" throwing="e" />
            <!--最终通知:无论程序发生任何事情,都将执行 -->
            <aop:after method="myAfter" pointcut-ref="myPointCut" />
        </aop:aspect>
    </aop:config>
</beans>
上述代码中,首先在第 4、7、8 行代码中分别导入了 AOP 的命名空间。第 12 行代码指定了切面类。
第 17、18 行代码配置了切入点,通知需要增强哪些方法,expression="execution(*com.mengma.dao.*.*(..))的意思是增强 com.mengma.dao 包下所有的方法。
第 20~32 行代码用于关联通知(Advice)和切入点(PointCut)。以第 20 行代码前置通知为例,<aop:before> 标签的 method 属性用于指定通知,pointcut-ref 属性用于指定切入点,也就是要增强的方法,其他几种通知的配置可以参考代码注释。
4. 创建测试类
在 com.mengma.aspectj.xml 包下创建测试类 XMLTest,如下所示。
package com.mengma.aspectj.xml;

import org.junit.Test;
import org.springframework.context.ApplicationContext;
import org.springframework.context.support.ClassPathXmlApplicationContext;
import com.mengma.dao.CustomerDao;

public class XMLTest {
    @Test
    public void test() {
        String xmlPath = "com/mengma/aspectj/xml/applicationContext.xml";
        ApplicationContext applicationContext = new ClassPathXmlApplicationContext(
                xmlPath);
        // 从spring容器获取实例
        CustomerDao customerDao = (CustomerDao) applicationContext
                .getBean("customerDao");
        // 执行方法
        customerDao.add();
    }
}
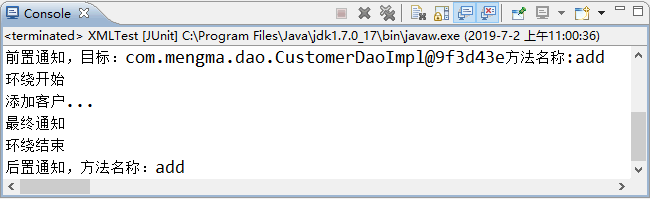
5. 运行项目并查看结果
使用 JUnit 测试运行 test() 方法,运行成功后,控制台的输出结果如图 1 所示。
:时间日期格式化")


发表评论